Here’s how we make our minimalist wallet.
I’m using one of my favorite leathers, ‘Wax’ from the Badalassi Carlo Tannery in Italy. It is a full vegetable tanned leather with pull-up effect.
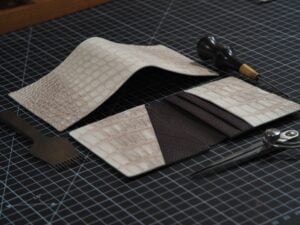
Pictured below are most of the tools you need. You’ll also need a stitching pony, a ruler, a cutting mat, a polyethylene board, a glue spreader, and a bone folder.
As far as consumables go, you’ll need some thin leather something around 0.8mm-1.1mm (2-3oz) will do the trick. Ours is 0.8mm (2oz) thick. Also needed is glue, thread, water, a finishing agent, and some finishing wax.

Step 1: Cut out the pieces

Step 2: Glue smaller T-slot onto back of small panel. The panel will face the inside of the wallet, making the wallet semi-lined. We use a water based contact adhesive.

Steps 3: Use a creaser to add a decorative line to the top of the T-slot, card pocket, and the back piece.

Step 4: Apply water to the top of the pockets, one by one. Use a canvas cloth to burnish. Use light pressure and be patient; it takes some time. Once your edge starts to look fairly shiny and smooth, you can then apply a finishing agent (we use Tokonole) and continue burnishing. Finally impregnate your canvas with some finishing wax (we use Columbus) and continue to burnish to a smooth, shiny finish.

Steps 5: Glue finished T-slot under the 1st piece. Glue thinly on bottom of T-slot, too. Mark your stitching line with a wing divider.

Step 6: Punch stitching holes.

Step 7: Saddle stitch T-slot onto panel.

Step 8: Tap down stitches with a cobbler’s hammer.

Step 9: Glue as shown below. There’s a thick band of glue because we’ll be trimming it.

Step 10: Attach the two pieces and tap down with a cobbler’s hammer to promote adhesion.

Step 11: Trim the whole piece to size. Our wallet measures 10.5cmx7.8cm. We used a custom die to save some time, but using a knife accomplishes the same thing.

Step 12: Mark stitching line on top of wallet and punch.

Step 13: Saddle stitch top.

Step 14&15: Add decorative crease to the top of the wallet, and burnish as described before.
Step 16: Prepare front to be glued, by roughing up the edges with sandpaper as shown.

Step 17: Glue front and back. Did you make sure you finished the top edges? Line up the tops to be flush and leave room on the sides and bottom to trim.

Step 18: Trim around the correctly-sized front to make the whole piece flush. Keep your knife blade perpendicular to the surface, especially when cutting the corners.
Step 19: Mark or finish making your stitching line.
Step 20: Punch the holes. Start with where the card slots are and line up stitching chisels correctly so that you don’t pierce the edge of your card slots. Do this for both sides, and continue around the wallet until you’re done.
Step 21: Saddle stitch. Here’s ours halfway done.

Step 22: Bevel and crease the edges.

Step 23: Lightly sand the edges. Start out with something like 280, and work your way up to around 1200.
Step 24: Use burnishing method described in the earlier steps.
Step 25: Move a bone folder around the inside of the wallet to remove any glue from doing anything unwanted.
Step 26: Admire the awesome wallet you just made!
Front:

Back:

Top: